Revert Interface changes to Snow Leopard, Part 1: Lion and Mountain Lion

0 comments
For many of us, the graphical and user interface changes made between Lion and Snow Leopard, although few and mostly subtle, were unwelcome. Some of us (*cough*) were so utterly disappointed by the minor annoyances that a full reversion to Snow Leopard was necessary.

However, drastic measures are not always the answer. With a number of minor tweaks, the most obvious changes to the design can be reverted to a more familiar Snow Leopard functionality.
  1. Finder sidebar
  2. Scrolling
  3. Window animations 

The Finder

The biggest and most obvious interface change was to the Finder windows. First, new windows open to a default "All My Files" section. For most of us, Finders in Snow Leopard opened to our home directory or to the Desktop. In addition, many of the subdirectories such as Downloads, Music and Pictures may be missing.

Begin by opening the Finder preferences to "Sidebar".

Uncheck "All My Files" and "AirDrop", and check whichever other subdirectories you want to appear.

In addition, check "Hard Disks" and the computer name under "Devices", and the username under "Favorites". In this case, the user is "admin", and the computer is named "Lisiriad". As in this picture, your "Hard Disks" may have a dash through it instead of a checkbox. Uncheck the box and re-check it to enable all hard disks to show up under "Devices".

If you would like "Library" to show up in the sidebar, enter a Terminal and run the command chflags nohidden ~/Library. By default, the Library folder has become hidden post-Snow Leopard. This will enable you to drag it from your home folder view into the sidebar.


Next, under the "General" tab, instead of "All My Files", choose "Desktop" or "admin" under the heading "New Finder windows show:".

Next, we restore the colored icons. Begin by installing the SideEffects package, obtainable here, or here (direct link). After installation, you may need to either killall Finder or log out and back in. Your Finder sidebar should now have the familiar Snow Leopard colored icons, although they will look a bit odd.

Fix this by going into the System Preferences -> General and changing "Sidebar Icon Size" to "Small".


Lastly, grab and drag the "FAVORITES" and "DEVICES" headers to switch their places.

After all of the above changes, your Finder should now look something like this.


Scrolling


The other additions many found particularly annoying was the reversed scrolling direction, inertia, and the bounce when the scrollbar hits the bottom or the top of a container.

Under Lion, the inertia setting is located in the System Preferences under "Universal Access", within &  Trackpad" tab. In Mountain Lion, the setting is instead under "Accessibility".

In either dialog, click the "Trackpad Options" near the bottom. Change "Scrolling" to "without inertia".

To disable the reversed scrolling, enter the "Trackpad" pane in System Preferences. Go to the "Scroll & Zoom" tab and uncheck "Scroll direction: natural".

If you have a USB mouse, you will also need to uncheck this in the "Mouse" preference pane.


Scroll Bounce

To disable the bouncing effect when scrolling near the top or bottom of a container, enter the following command in a Terminal: defaults write -g NSScrollViewRubberbanding -int 0

You may have to log out for this option to take effect. To re-enable the bounce, enter defaults write -g NSScrollViewRubberbanding -int 1.


Window Animation

Finally, many of us found that the window opening animation, which is rather subtle, nevertheless produced a noticeable lag on any activity. This animation happens when a new window of any application opens, and a "zoom" effect quickly takes the window from nothingness to its full size.

To disable this animation, enter the following command in a terminal:
defaults write NSGlobalDomain NSAutomaticWindowAnimationsEnabled -bool 0

 To re-enable window animations, enter:
defaults write NSGlobalDomain NSAutomaticWindowAnimationsEnabled -bool 1


Read Full Post

Change a Mac user's password temporarily

1 comments
As a sysadmin, there may be times when you absolutely must access somebody's actual desktop for legitimate reasons -- or some clandestine ones. But in an environment where users are allowed their own passwords and are for whatever reason unavailable, and you either don't want to reset the password or don't want to be caught, you may want to reset the password for the duration of your use, and change it back after you're done.

The first step is to determine the user's hash ID. Password hashes are stored in the /var/db/shadow/hash directory. To see the hash IDs for all users, you can use the dscl command as root: dscl . -list /Users GeneratedUID

You will see a list of all "short" names for users and their hash IDs.
In this case, the hash ID for the user `drsavoye` is 6D5D3B6D-5D64-4396-ACD3-6FFCE4DC75E3. Now, navigate to /var/db/shadow/hash/, where you will see the files 6D5D3B6D-5D64-4396-ACD3-6FFCE4DC75E3 and 6D5D3B6D-5D64-4396-ACD3-6FFCE4DC75E3.state. The *.state files store information such as the number of failed login attempts for a user, whether or not the password expires and the last login date.

Make a backup, preferably outside of this directory, of both files. Now, remove them both from the hash directory. The user will now have no password, but they system still thinks they do, so you will not be able to log in with a blank password.

Change the user's password to something temporary by using passwd drsavoye. Now, you will be able to log in to their desktop with the password you chose. In later versions of OS X you may be prompted to reset or delete their keychain file -- "Cancel" or close the dialog, as you want the keychain to still use the old password.

When finished, log the user out first and restore the copies of the files you deleted back into the hash directory.


Read Full Post

Making a custom sudoers file

2 comments
For a sysadmin, allowing access to sudo is nerve-wracking, particularly if you work in an environment where you seem to be the only one concerned about security, where passwordless accounts are abundant and all users are made administrators for ease of access. This is most common in OS X clusters, as Linux does not permit empty passwords by default. A properly configured sudoers file is very important.

This assumes you have already sorted your users into appropriate groups, such as removing guests from the 'wheel' group.

Defining command and user aliases
The first section to edit will be # Cmnd alias specification. You can define groups of commands such as:

Cmnd_Alias SYS_COMMANDS = /sbin/unmount, /sbin/mount

Cmnd_Alias SERVICES = /bin/ls, /bin/cat, /sbin/halt, /sbin/reboot,
/sbin/shutdown

Cmnd_Alias ADMIN_TOOLS = /usr/bin/passwd, /bin/chmod, /bin/chown, /bin/chgrp

Cmnd_Alias EDITING = /usr/bin/vi

Cmnd_Alias STORAGE = /sbin/fdisk, /sbin/sfdisk, /sbin/parted,
/sbin/partprobe

You can also append options to the commands; for example, creating an alias for /usr/bin/su - Guest, meaning that it is permissible to use sudo su - Guest, but not sudo su - some-other-user.

User aliases operate using the same syntax:
User_Alias      GUESTS  = guest, user, bob
User_Alias ADMINS = joe, alice
Limiting and denying commands to users and groups
Next, edit the # User privilege specification section. A % denotes a group, while a string without indicates a user:
# root and 'wheel' group users can run all commands as long as they authenticate
with their passwords
root ALL = (ALL) ALL
%wheel ALL = (ALL) ALL

# only bob can use storage tools
bob ALL = STORAGE

# ADMINS can use chmod, chown, chgrp and passwd, but they can't change root's password
%ADMINS ALL = ADMIN_TOOLS !/usr/bin/passwd root

# 'admin' group users can use all commands in the EDITING alias with a password, and
all commands in SYS_COMMANDS and SERVICES without authenticating; but can't use any
other commands
%admin ALL = EDITING, NOPASSWD:SYS_COMMANDS,SERVICES

# Guest users, who don't have passwords, can only mount and unmount drives
%guest ALL = NOPASSWD:SYS_COMMANDS

# joe can authenticate to use any command in /bin except for chmod, chown, chgrp,
chown and vi, but he can use /bin/find without authenticating (there is no real
usefulness to NOPASSWD in this case)
joe ALL = /bin, NOPASSWD:/bin/find, !/bin/chmod, !/bin/chgrp,
!/bin/chown, !EDITING

# alice can su to any user except for root, but without flags (su - user is not allowed)
alice ALL = /usr/bin/su [!-]*, !/usr/bin/su *root*

# everybody needs to be able to kill a program when it hangs without authenticating
ALL ALL = NOPASSWD:/bin/kill


Defining default settings
A few useful Defaults specifications:

# only allow one failed password attempt
Defaults passwd_tries += "1"

# the message when a user types an incorrect password
Defaults badpass_message += "And just what do you think you're doing, Dave?"

# this prevents sudo from being used in a script; the user must be logged in
Defaults requiretty


Read Full Post

Enable root login from LAN only

1 comments
Having SSH access to the root account can be catastrophic if someone ever does succeed in breaking into your machine. While the majority of sysadmins turn into rabid wolves upon mention that your machine allows root access, at times it may be necessary.

This should work on any UNIX-based operating system running OpenSSH 4.3p or later. You may determine the version of OpenSSH by using ssh -V.

On Linux, edit /etc/ssh/sshd_config. On Macs, edit /etc/sshd_config. Locate the line that defines PermitRootLogin, uncomment if it is commented out, and change its value to no.

On a separate line, add the following:
Match Address 192.168.2.*,127.0.0.1
      PermitRootLogin yes

This will allow root to login exclusively from your LAN, while denying all attempts from outside.

Tips: Extra security features to go along with this would be:

- Denying usage of 'sudo su'
- Disabling passwordless, guest, or otherwise anauthorized users from using 'su'
- Using the above Match Address syntax to only allow root to login using a publickey, not passwords
Read Full Post

Streaming audio between Linux machines

0 comments
My laptop, being my mobile machine, contains all of the music I listen to on a daily basis. At home, it's nice to hook it up to my stereo so I can hear it throughout the house. However, while there is music playing, the laptop is no longer mobile and stuck within a three-foot leash of the stereo.

Having recently resurrected an old desktop to function as a MythTV, DVD-watching and backup machine and wired it into the stereo, it was extremely simplistic to stream the audio wirelessly from my laptop and have it be received on the desktop, to be piped into the stereo.

For this guide, I am utilizing Fedora 9 on the laptop (client) and freshly-installed Fedora 12 (server) with glibc on the desktop, although this should work on any Linux distro. You will need the following packages on both machines:
pulseaudio
pulseaudio-module-zeroconf
paprefs
padevchooser

Setting up the sound server

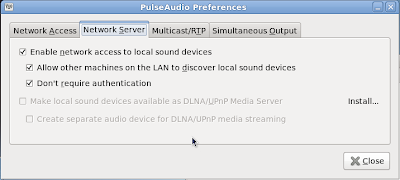
First, on the server, launch paprefs from the terminal. It can also be accessed through the PulseAudio Device Chooser (located in Applications -> Sound & Video), under "Configure Local Sound Server." In the Network Server tab, check all applicable boxes:


You may also enable Multicast/RTP, although this is not required for a simple sound server.


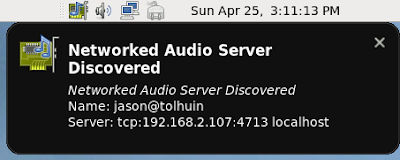
Now, start up padevchooser. An alert should appear notifying you of a new sound server.


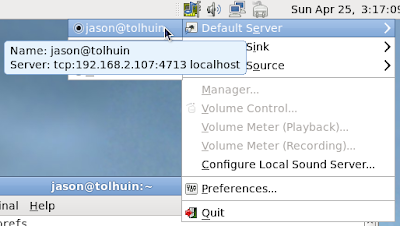
Select the new server as the default.


Setting up the sound streamer

Now launch padevchooser on the client, and select the same server.


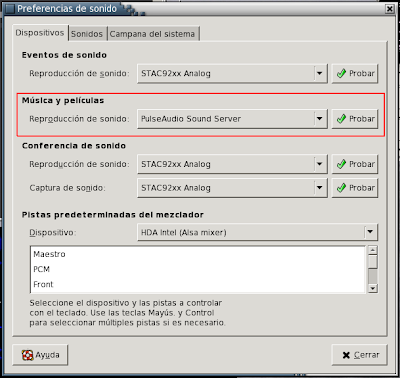
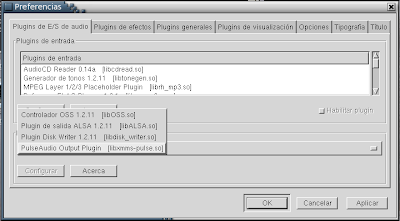
Configure your sound properties to use PulseAudio as the audio output. This will vary by distribution and by version, as the pictured F9 gnome-sound-properties dialog does not exist in F12.


In some cases, such as XMMS, you may have to configure its output manually, in addition to the system-wide output.

In fact, if possible, it is far safer to configure individual programs to use Pulse if it is not already your sound device -- those of us using OSS or ALSA for system-wide sound, for example.


You do not have to have padevchooser open all the time. You can close it once the default server has been selected. Although the client's volume does not communicate to the PulseAudio server, the individual applications should, (such as XMMS's native volume control) as well as the volume on the server.

You may have to open ports 4713 and 59352 on both machines before the audio will connect.
Read Full Post

Copy-pasting on the Linux command line

0 comments
On Mac OS X, since the Apple key is used for copying instead of Ctrl, copy-pasting works within the Terminal. On Linux, Ctrl-c sends an interrupt signal.

Instead, use Ctrl-Shift-c to copy within a terminal, and Ctrl-Shift-v to paste. Other similar commands are:
  • Ctrl-Shift-t : Create a new tab
  • Ctrl-Shift-w : Close the tab
  • Ctrl-Shift-q : Close the entire window, tabs and all
  • Ctrl-Shift-n : Create a new window

Read Full Post

Showing hidden files in the Finder

0 comments
By default, OS X does not show its hidden directories, such as /etc, /var, and /usr, in the Finder, although they are still accessible using Go from the menu.

To enable them, use the command defaults write com.apple.finder AppleShowAllFiles -bool true as root.


Read Full Post

Fixing a slow SSH prompt

1 comments
For owners of multiple Linux machines, it's happened to all of us -- the machine in the living room responds immediately to SSH; but it takes forever to log in to the one in the closet, although it does succeed eventually.

This happens because of the SSH client attempting various authentication methods. Using ssh -vvv user@host, the output of a slow connection will look something like this:

debug3: check_host_in_hostfile: filename /home/drsavoye/.ssh/known_hosts
debug3: check_host_in_hostfile: match line 11
debug1: Host '192.168.2.107' is known and matches the RSA host key.
debug1: Found key in /home/drsavoye/.ssh/known_hosts:11
debug2: bits set: 499/1024
debug1: ssh_rsa_verify: signature correct
debug2: kex_derive_keys
debug2: set_newkeys: mode 1
debug1: SSH2_MSG_NEWKEYS sent
debug1: expecting SSH2_MSG_NEWKEYS
debug2: set_newkeys: mode 0
debug1: SSH2_MSG_NEWKEYS received
debug1: SSH2_MSG_SERVICE_REQUEST sent
debug2: service_accept: ssh-userauth
debug1: SSH2_MSG_SERVICE_ACCEPT received
debug2: key: /home/drsavoye/.ssh/id_rsa (0xb7f541a8)
debug2: key: /home/drsavoye/.ssh/identity ((nil))
debug2: key: /home/drsavoye/.ssh/id_dsa ((nil))
debug1: Authentications that can continue: publickey,gssapi-keyex,gssapi-with-mic,password
debug3: start over, passed a different list publickey,gssapi-keyex,gssapi-with-mic,password
debug3: preferred gssapi-with-mic,publickey,keyboard-interactive,password
debug3: authmethod_lookup gssapi-with-mic
debug3: remaining preferred: publickey,keyboard-interactive,password
debug3: authmethod_is_enabled gssapi-with-mic
debug1: Next authentication method: gssapi-with-mic
debug3: Trying to reverse map address 192.168.2.107.
debug1: Unspecified GSS failure. Minor code may provide more information
No credentials cache found

debug1: Unspecified GSS failure. Minor code may provide more information
No credentials cache found

debug1: Unspecified GSS failure. Minor code may provide more information


debug2: we did not send a packet, disable method
debug3: authmethod_lookup publickey
debug3: remaining preferred: keyboard-interactive,password
debug3: authmethod_is_enabled publickey
debug1: Next authentication method: publickey
debug1: Offering public key: /home/drsavoye/.ssh/id_rsa
debug3: send_pubkey_test
debug2: we sent a publickey packet, wait for reply
debug1: Authentications that can continue: publickey,gssapi-keyex,gssapi-with-mic,password
debug1: Trying private key: /home/drsavoye/.ssh/identity
debug3: no such identity: /home/drsavoye/.ssh/identity
debug1: Trying private key: /home/drsavoye/.ssh/id_dsa
debug3: no such identity: /home/drsavoye/.ssh/id_dsa
debug2: we did not send a packet, disable method
debug3: authmethod_lookup password
debug3: remaining preferred: ,password
debug3: authmethod_is_enabled password
debug1: Next authentication method: password
root@192.168.2.107's password:


In this case, GSSAPI is failing alongside publickey-authentication, but unlike publickey, takes much longer to give up. To disable it, edit /etc/ssh/sshd_config and remove or comment out the lines #GSSAPIAuthentication yes and #GSSAPICleanupCredentials yes.
Read Full Post

Installing OS X with an incompatible "OEM" disk

0 comments
Like Windows, new Macs come with a preloaded disk in case you ever need to reinstall. What many users owning multiple machines -- or desperately borrowing friends' disks after their Mac becomes unbootable -- learn the first time they attempt to use it, however, is that the disk is designed to install on only the original Mac it was shipped with, informing only that the software is incompatible upon installation with no further explanation.

If the original Mac exists, booting the intended machine into Target Mode using FireWire and tricking the CD into installing onto the mounted hard drive is the easiest option. But what if the original Mac is missing, sold or no longer functional?

Editing and re-burning the disk, although illegal, is possible yet not the simplest solution by any means, not the least of which because most users don't have 8GB DVDs sitting around. You will still need a second Mac running the same version and architecture of OS X which you intend to install, a FireWire cable and the preloaded installation disk (more on architecture below).

  1. Preparing the target drive
  2. Building the installation from source
  3. Filling in missing files
  4. Repairing the drive
  5. Booting the drive and running Setup Assistant
  6. Common errors
Preparing the Drive
Begin by hooking up the target drive to another Mac via FireWire if it is already inside a machine, or via USB if you are installing on an external drive. If it is inside a Mac, start the machine in Target Mode by holding down the T key immediately after powering on, until the blue screen appears with the bouncing FireWire emblem.

It may take anywhere from several seconds to several minutes for your drive to mount. If the drive is already empty and partitioned, you will not need any preparation; if it contains any data or is not formatted correctly, you will need to repartition the drive.

Note: You do not need to format the disk if you are upgrading instead of reinstalling.

Be very sure to format the filesystem according to your architecture, or else after all the effort your drive will not be able to boot. Newer Macs such as MacBooks and iMac flatscreens use Intel x86 processors, while older models such as iBooks, PowerBooks and G5 towers use Apple's custom PowerPC architecture. The architecture of the machine can easily be determined by running the arch command. PowerPCs will return ppc, while Intel-based Macs will be either i386 or i686. This is important because PowerPCs must be formatted with the Apple Partition Scheme, while Intel Macs are partitioned using the GUID Partition Table. It is very important that the host Mac has the same architecture as the machine to be reinstalled, as the DVD installer will go off of its host's configuration to install the appropriate kernel extensions and drivers.


Format the drive according to your architecture by selecting Options from the Partitions tab.


Building the Installation

While installing this way is not "from source" in the strictest sense, it is an alternative to running the built-in installer application included on the disk as each package must be installed manually, and more or less in the correct order, although some deviation will not cause any long-term problems aside from the package refusing to install in the first place.

If you are installing on the command-line, navigate to /Volumes/Mac\ OS\ X\ Install\ DVD/System/Installation/Packages. From the Finder, this folder cannot be accessed directly but can be found by inserting the above location using Go -> Go to Folder. From the Finder, the packages listed herein can be installed by double-clicking. Note that the package will try to install by default on the machine you are currently sitting on. You must click "Change Install Location" and select the mounted drive for each package. From the command-line, install the packages with the installer command:

sudo installer -pkg package.pkg -target /Volumes/PowerBook\ HD

Install the packages in the following order. They may vary slightly by distribution.
BaseSystem.pkg
DeTier.pkg
Essentials.pkg
AdditionalEssentials.pkg
AdditionalFonts.pkg
Directory.pkg
Java.pkg
JavaTools.pkg
MigrationAssistant.pkg
X11User.pkg (optional if you want to use X11)
MediaFiles.pkg
ACL.pkg


Optional Applications:

AddressBook.pkg
Mail.pkg
Safari.pkg
iCal.pkg
iChat.pkg
iTunes.pkg
iPodSupport.pkg
DVDPlayer.pkg

You can of course install every package in the directory, including the extra language support and XCode Tools, but these files are what is needed for a minimalistic OS X installation. This will take roughly the same amount of time as a normal installation, so allow 30-45 minutes to complete. When finished, you will now have a bare minimum -- albeit only half-functional -- installation of Mac OS X.

Filling in the Holes
I have not been able to find the section of the disk which creates the hidden directories properly. (Please leave a comment if you do.) In the meantime, you will need to recreate the /private/etc and /usr directories, which although they are created during the installation do not contain many files needed to actually boot the system. You will need to clone them from another Mac, ideally one which has not had too many custom executables installed -- e.g. as close to the fresh installation state as possible.

The drive will not yet show up in the boot menu, so keep it mounted on the host Mac. Use the following commands to clone the missing directories:
sudo rsync -avH /usr /Volumes/PowerBook\ HD
sudo rsync -avH /private/etc /Volumes/PowerBook\ HD/private/
Be sure not to include the trailing / on /usr and /etc, as including it will copy the contents of the directories instead of the directories themselves.

Booting the Drive
You will now have a close-as-possible legit installation of OS X. Unmount the drive, disconnect the FireWire or USB cord, (some models will refuse to boot with it plugged in) insert the original installation disk into the new machine and boot into it. Click OK when the prompt appears informing you of incompatibility. From here, select Utilities -> Startup Disk from the menu and select your drive. Reboot and eject the disk. If you attempt to boot before this, you will find that while the drive may be seen, it will be unnamed and will freeze at the login screen.

Typically, you will now be run through the Setup Assistant and may proceed as you would with a normal installation. It may be frozen at the login screen for several moments before loading Setup Assistant, as it has attempted to load normally before realizing that no users exist, since it was not completed in the usual way.

Common errors
I encountered several errors during my first attempt; namely, I had booted prior to selecting the disk as the startup volume, which froze indefinitely at the login screen. This created a cache file which prevented Setup Assistant from being able to start.

The cache is located in /Library/Caches/LaunchServices/com.apple.LaunchServices-0140.csstore. There may be several with different trailing numbers depending on how many times you attempted to boot. Remove these files. Upon reboot, Setup Assistant will launch.

Setup Assistant will also not launch unless a file located in /var/db/.AppleSetupDone is missing. This file contains the registration information for your Mac. Removing it will allow you to re-register any Mac, although you may also edit the file if you simply want to change your name or address. If the file exists, remove it.


Several errors may be present due to the copying of the /etc and /usr directories. Most importantly, check that the modes on both directories are correct:
Minimac:/ root# ls -l | grep usr
drwxr-xr-x 12 root wheel 408 Nov 23 10:34 usr
If they differ, use the following to correct them:
sudo chown -R root:wheel /private/etc /usr
sudo chmod 755 /private/etc /usr

The first time opening Terminal.app, you may be greeted with the following error instead of a prompt:
login: PAM Error (line 396): System error
login: Could not determine audit condition

[Process completed]
In the Finder, use Go to Folder to navigate to /usr/bin and drag the login file to the trash.

Sudo may also malfunction, if the /etc/sudoers file does not exist or its mode is wrong. The correct mode is 0440.

Depending on how long you remain logged in and allow the caches and databases to propagate, you should be be prompted with various updates and security fixes, during installation of which you should watch /var/log/system.log for possible errors.

You will now have a working, out-of-the-box installation of Mac OS X.
Read Full Post

Disable the Screen Sharing menu icon

4 comments
Whether your boss has requested you keep an eye on a coworker or you just want to spy on your little brother, the menu icon that alerts users of your watchful presence can be an annoyance and a dead giveaway.

There are two ways to disable it. If you are using Apple Remote Desktop (ARD) to control Screen Sharing, you may simply hide it:
sudo /System/Library/CoreServices/RemoteManagement/ARDAgent.app/Contents/Resources/kickstart -activate -clientopts -setmenuextra -menuextra no

If you are not using ARD, this will not work and you will have to remove the icon manually. The configuration is located in /System/Library/CoreServices/Menu Extras/RemoteDesktop.menu. You can either rename it, remove it completely or change its permissions to 000.

This will also work with any of the items in the Menu Extras directory, such as the volume, clock, or Fast User Switching menu.
Read Full Post

Customizing the OS X login screen

0 comments
Changing the Background
The background image can be changed by simply replacing the file. In Leopard, the default background is located in /System/Library/CoreServices/DefaultDesktop.jpg. In Tiger, the file is /Library/Desktop Pictures/Aqua Blue.jpg. Rename the default to a different name and copy your file of choice over the original file.


Customizing Users
There are many tweaks one can make to the user list. Say you want to create an invisible user only accessible via SSH. Or to hide all users with certain UIDs, or hide the Other user once the root account has been enabled.

First, if you mess up something too badly, it is always possible to remove your edits by using
defaults delete /Library/Preferences/com.apple.loginwindow and
defaults delete /Library/Preferences/com.apple.loginwindow HiddenUsersList to delete users you may have hidden. Any value using TRUE may also be reversed by substituting FALSE and vice-versa.

To hide a user from the login window, use:
defaults write /Library/Preferences/com.apple.loginwindow HiddenUsersList -array-add 'jason'
You can use the user's UID instead as well. The user will also no longer appear in the Fast User Switching menu once someone has logged in.

To hide all users with UIDs under 500 -- e.g. root and the built-in Guest account:
defaults write /Library/Preferences/com.apple.loginwindow Hide500Users -bool TRUE

To hide the Other user:
defaults write /Library/Preferences/com.apple.loginwindow SHOWOTHERUSERS_MANAGED -bool FALSE

Do not try and hide all your users as this will cause the login window to be unfunctional. The login screen with the three examples shown above:


Read Full Post